Increasingly, IT development organizations are turning to automated testing techniques to improve the quality of their code and to save time and money. While this market remains fractured, Selenium, Cucumber, and Gherkin have become quite popular and are increasingly the frameworks of choice for user interface and integration test automation.
This guide is intended for someone who is not familiar with Selenium, Cucumber, Gherkin and would like to get started. We will go through the installation of the framework, describe how the technologies work together, and then write a few tests.
Through this guide you will install and use the following:
- Ruby (2.3.3 or higher)
- Selenium Webdriver (3.2.1)
- Cucumber (2.4.0)
- Gherkin (4.1.1)
- Text Editor or IDE (SublimeText, Atom, Notepad++, Eclipse)
- Firefox
Platforms Covered:
- Mac OS X
- Windows
NOTE: As of the latest update of this blog on March 21, 2017 we suggest you use Selenium Webdriver 3.2.1 and not a newer version since the newer versions of Selenium Webdriver are incompatible with Firefox.
Step 1: Browser Setup - Install FireFox
Download and install FireFox: https://www.mozilla.org/firefox
Note: On Windows, if FireFox is installed in a non-standard location (i.e. outside Program Files) then you must add the FireFox directory to your PATH environment variable.
Step 2: Install Ruby, Cucumber, Selenium and other dependencies
Mac OS X
$> brew install ruby
$> gem install bundler
$> sudo gem install selenium-webdriver -v 3.2.1
$> gem install cucumber
$> gem install rspec
Windows
Use the Windows Ruby Installer: http://rubyinstaller.org/
- Download RubyInstaller for Ruby 2.3.3 (or higher) - During the install choose to include all packages
- Install in a directory that does not contain spaces in its path (such as C:\Ruby, but not C:\Program Files\Ruby)
- Download the Ruby Development Kit (RDK) for your associated Ruby Installer at http://rubyinstaller.org/downloads/ in the section labeled "Development Kit"
- Run the RDK installer and extract it somewhere permanent (for convenience, consider extracting it in the same directory as where you installed Ruby)
$> ruby dk.rb init
$> ruby dk.rb install
Install the necessary gems:
$> gem install bundler
$> gem install selenium-webdriver -v 3.2.1
$> gem install cucumber
$> gem install rspec
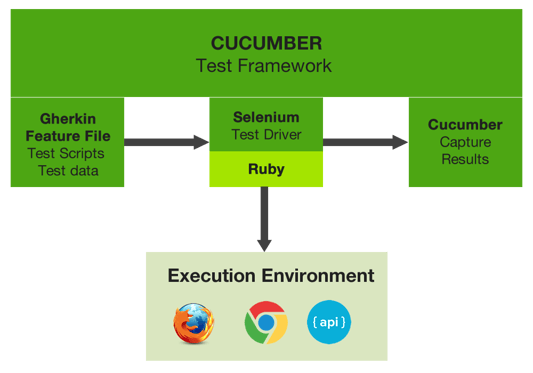
Let's talk about what you just installed:
Ruby is the language we will use to write the test code. You can use Java or any number of other languages. I like Ruby as it is fairly easy to learn language, does not require a compiler, and there are a lot of Ruby Selenium/Cucumber examples on the web. Plus Cucumber is written in Ruby, so it’s a natural choice.
Cucumber, along with Gherkin, is the testing framework. Gherkin is the business language we use to write the tests in a “human readable” way. Cucumber ties the Gherkin feature files to the execution code written in Ruby. Cucumber helps us capture test results as well.
Selenium is the HTTP driver used to navigate a browser from code. Often people refer to user interface automated tests as “Selenium Tests” but these are more accurately called “Behavior Driven” or “Acceptance Driven” tests.
RSpec is a behavior-driven development framework for the Ruby programming language. It contains its own mocking framework and is also useful for performing assertions.

Step 3: Write a basic Selenium/Ruby Test
Before we introduce Cucumber and Gherkin, let's make sure we understand the foundation. In our first example we will create a Ruby script that uses Selenium Webdriver to load a webpage in a browser.
Create Ruby file: test.rb
require 'selenium-webdriver'
driver = Selenium::WebDriver.for :firefox
driver.navigate.to "http://mock.agiletrailblazers.com/"
driver.quit
Run from the command line:
$> ruby test.rb
This simple Ruby script launches a browser and once the page is loaded, it will close the browser.
Step 4: Write a slightly less basic Selenium/Ruby Test
Now that we can launch a browser and close it, let's take it a bit further and interact with the browser before closing it.
Update the Ruby file test.rb
require 'selenium-webdriver'

driver = Selenium::WebDriver.for :firefox
driver.navigate.to "http://mock.agiletrailblazers.com/"

driver.find_element(:id, 's').send_keys("agile")
driver.find_element(:id, 'submit-button').click

wait = Selenium::WebDriver::Wait.new(:timeout => 5) # seconds
begin
  element = wait.until { driver.find_element(:id => "search-title") }
  element.text.include? 'Search Results for: agile'
ensure
  driver.quit
end
Run from the command line:
$> ruby test.rb
This Ruby script will launch the browser, then send the keystrokes “agile” into the search field and submit the form. The script then looks for a CSS class called “page-title,” waiting up to 5 seconds. This “wait” is crucial and is needed to give the browser the opportunity to finish loading the page. Finally, we verify the outcome by checking if the web page title contains the text we expected. This assertion drives the success or failure of the test.
Step 5: Introduce Cucumber and Gherkin
Now that we have the basics down for Selenium and Ruby let's re-do this example adding Cucumber and Gherkin. To do that let's take a step back and think about how this behavior would be described in Gherkin. Now we will have two files – a feature file containing the Gherkin syntax of the test and a Ruby file containing the test execution code.
Create a file called search.feature:
Feature: Site Search
Scenario:
  Given We navigate to the homepage
  When We search for the word agile
  Then The results for the search will be displayed
Gherkin uses the GIVEN/WHEN/THEN verb keywords along with other keywords such as Feature, Scenario, And, etc. For more information on Gherkin, go to https://cucumber.io/docs/reference.
Next, Create a subdirectory called “step_definitions.” This is important as Cucumber uses this naming convention to find the test execution code.
Create a file called search_steps.rb in the step_definitions folder:
require 'selenium-webdriver'
driver = Selenium::WebDriver.for :firefox

Given(/^We navigate to the homepage$/) do
  driver.navigate.to "http://mock.agiletrailblazers.com/"
end

When(/^We search for the word agile$/) do
  driver.find_element(:id, 's').send_keys("agile")
  driver.find_element(:id, 'submit-button').click
end

Then(/^The results for the search will be displayed$/) do
  wait = Selenium::WebDriver::Wait.new(:timeout => 5) # seconds
  begin
    element = wait.until { driver.find_element(:id => "search-title") }
    expect(element.text).to eq('Search Results for: agile')
  ensure
    driver.quit
  end
end
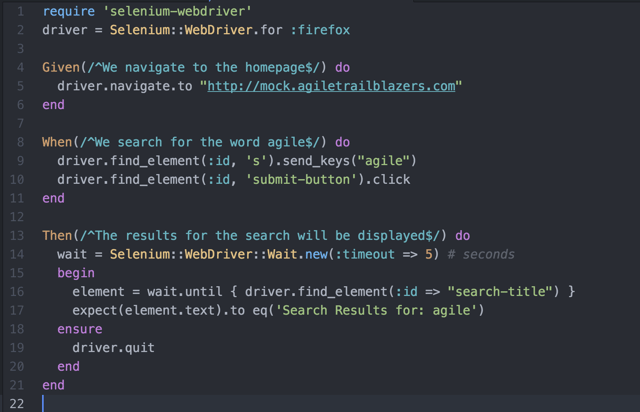
You will notice this is almost identical to the prior example except we have inserted Given, When, Then methods. These methods correspond to the Gherkin code, and Cucumber knows to execute each method based on the line in Gherkin.
Now let's run the test. From the folder, that contains the search.feature file, run this command:
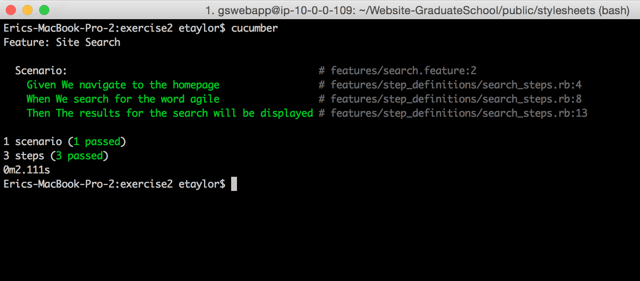
$> cucumber
Here are the results in the console:
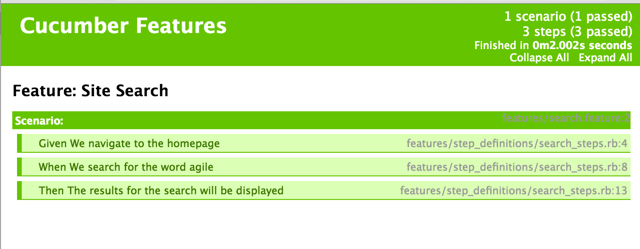
Cucumber can also write the results to a file in different formats: HTML, JSON, JUnit, etc.
$> cucumber -f pretty -f html -o report.html
Here is an example of the HTML output:

At this point, we have introduced all of the basic frameworks and languages that are needed to start building a larger test suite. In our example here, we created some simple user interface automation tests, but it's important to remember this is only one part of a good automation strategy, which will also include integration and unit tests. For more on this, see our related blog about organizational testing strategy.
To become an ICAgile Certified Professional in Agile Testing or to learn more about automation and Agile testing check out our courses.